Overview
ContactMonkey's HiBob integration pulls employee data from HiBob into ContactMonkey through our HRIS connection. Once connected, your HiBob employee records flow into ContactMonkey and refresh on a regular schedule, so you can build and target internal communications against up-to-date org data.
The connection uses OAuth for a secure, one-click authorization. You sign in to HiBob once, approve the permissions ContactMonkey needs, and you're connected. No API keys, service users, or manual token handling required.
The integration is read-only. ContactMonkey reads employee data from HiBob to keep your lists current; it never writes data back into HiBob.
Before you begin
Make sure you have:
- A ContactMonkey account with Admin/Owner permission to manage integrations.
- A HiBob admin account or a user with permission to install and authorize apps from the HiBob Marketplace. You'll be prompted to sign in to HiBob and approve access during setup.
- To authenticate HiBob using a Service Account, you will need to provide the following information:
- Service Account User ID
- Service Account Token
- To authenticate HiBob using a Service Account, you will need to provide the following information:
- Confirmation of which HiBob data you want to sync (see How data syncs below), so you can approve the right permissions.
Already connected to HiBob on the legacy method? HiBob is retiring its older Service User authentication. If your HiBob connection was set up before the move to OAuth, you'll need to reconnect once using the steps below to switch it to OAuth. It's the same quick one-click flow but it has to be done per HiBob account rather than in bulk.
Preparing your HiBob Connection
- Create the Service User in your HiBob account
- Navigate to your HiBob System Settings
- On the Settings screen, open Integrations and click Manage on the Service users tile
- Click on Create service user
- Enter any Display name and click Create
- On the next screen, HiBob display the credentials for your new service user. Make a note of both the ID and the Token, then click on Go to permission groups and proceed with the next step
- Create a permission group
- Click Create permission group, then Service user
- Enter any Group name, select your new service user under Select service users and click Create
- When asked to confirm the changes, click Confirm
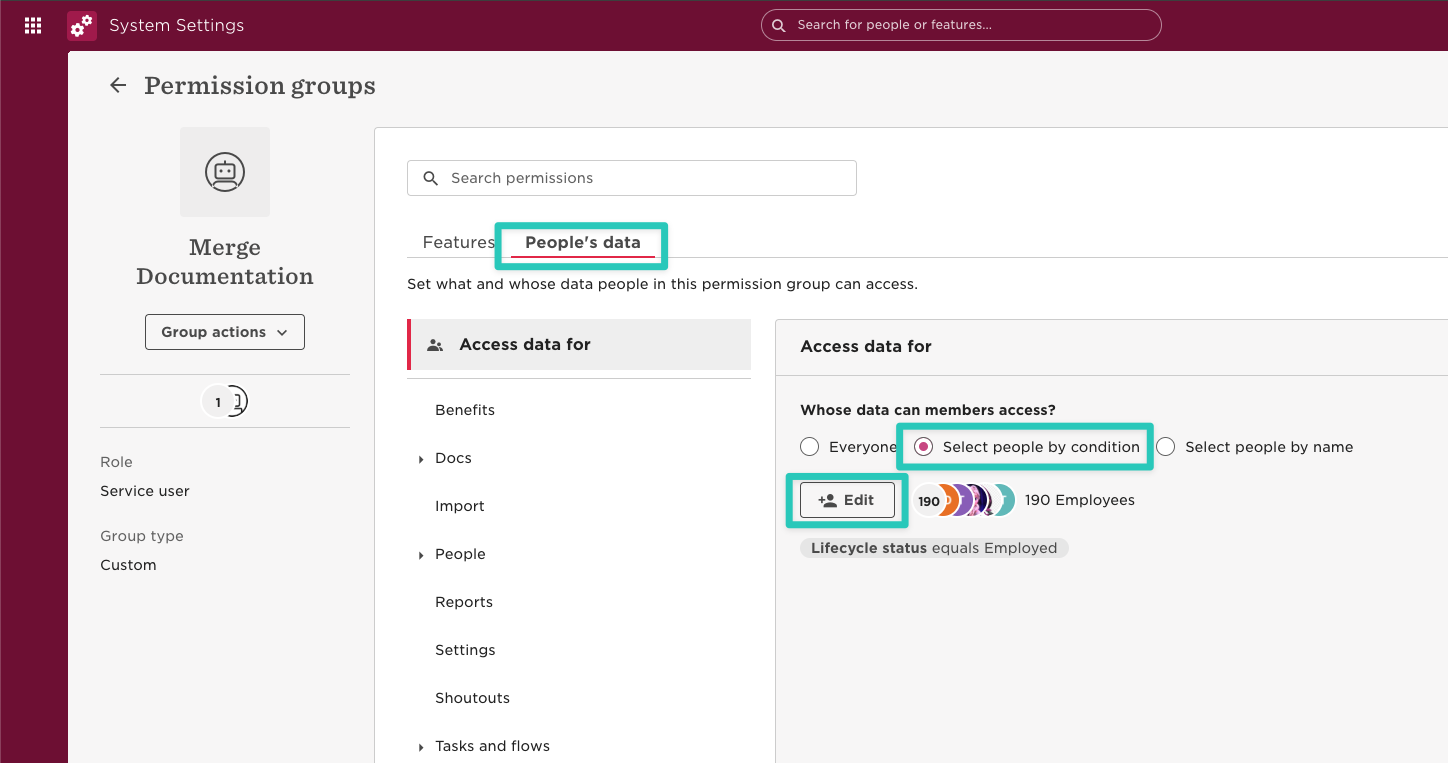
- Switch to the People's data tab of the new Permission Group and click Access data for. Click Edit permissions on the top right corner. Pick "Select people by condition" under Whose data can members access?, then click on Edit to select the people the integration can acces
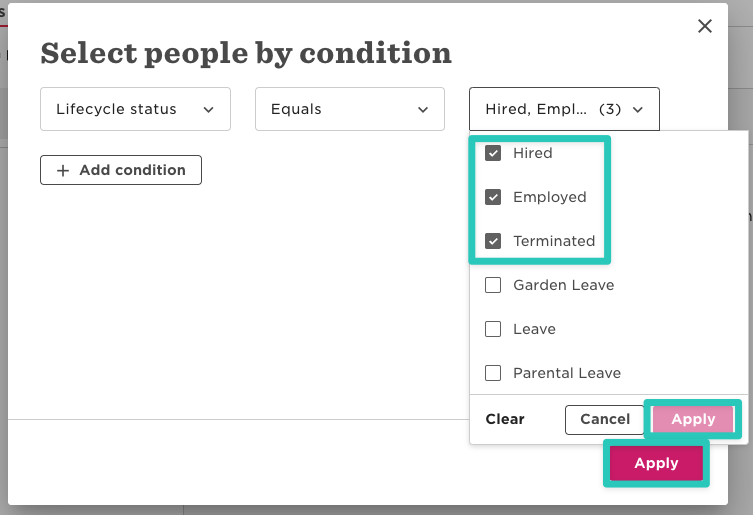
- In the Select people by condition pop-up, select all relevant Lifecycle Statuses. In most scenarios this will include Hired, Employed, and Terminated. Click Apply twice once done:
- Back in the People's Data add the following permissions based on the required fields you need to share for your integration:
- For each permission category, select the View selected employees' [Permission] sections and View selected employees' [Permission] section histories permission.
- If you need Date of Birth or the full unobscured SSN fields, you must include both View and Edit access for the appropriate permission. Note that we will NOT edit any employee sections.
- Once done adding the permissions, finish creating the Permission Group by selecting Save and Apply the changes.
HiBob Permission Associated Fields People > Basic Info (required) Name People > Employment
People > Work
Company
Employee Number
Manager
Start Date
Termination Date
Work Email
Work Location
Department
Employment Type
People > Work contact details Work Email People > Personal Date of Birth (requires Edit permission)
Mobile Phone Number
People > Personal contact details Mobile Phone Number
Personal Email
People > Home Gender
Marital Status
Personal Email
People > Lifecycle Employment Status People > Identification SSN (requires Edit permission for the full unobscured SSN fields) People > Address Home Location People > EEO Ethnicity People > About Avatar
Configuring the integration in ContactMonkey
Follow these steps to connect HiBob to ContactMonkey.
- In ContactMonkey, go to Settings → Integrations and click on the HRIS Sync integration tile. A secure modal with every integration will open.
- Find HiBob and continue. You'll be redirected to HiBob to sign in.
- Sign in to HiBob using an admin account (or an account with permission to authorize apps).
- Review the permissions ContactMonkey is requesting and click Allow / Authorize to approve them:
- View employee data — required for all use cases
- View sensitive employee data — needed only if you sync personal fields like date of birth or national ID
Once you approve, you'll be returned to ContactMonkey and the HiBob connection will show as Connected.
Confirming the integration in ContactMonkey
After the connection is live, finish setup inside ContactMonkey:
- Confirm the HiBob connection status reads Active on the Integrations page.
- Confirm fields — check that HiBob fields (e.g. work email, first/last name, department, job title, location, manager) map to the corresponding ContactMonkey fields by looking in Directory.
- Build your lists from the synced HiBob data — for example, create lists segmented by department, location, or manager.
How data syncs
Direction: One-way, HiBob → ContactMonkey. Data is read from HiBob into ContactMonkey; nothing is written back to HiBob.
The exact fields available depend on your HiBob configuration and the permissions you approved during setup.
How often it syncs: ContactMonkey refreshes HiBob data automatically on a regular schedule, and you can trigger an on-demand re-sync at any time by going back into the integration flow and Re-linking the account.